
OpenCV基于YOLOv4实现的目标检测与视频录制
2025-03-30
项目已托管到github
github.com/Anyuersuper/CameraDetect
可以检测人脸,车辆,行人,讲道理来说,凡是yolov4可支持的检测你都可以检测出来,自己加一个标签就好了
项目结构:
CameraDetect/
├── main.py              # 主程序入口
├── VideoRecorder.py     # 视频录制模块
├── VideoPlayer.py       # 视频播放模块
├── VideoBrowser.py      # 视频浏览模块
├── Yolo4Detect.py       # YOLOv4 目标检测模块
├── videos/              # 录制的视频存储目录
└── yolo/                # YOLOv4 模型文件目录
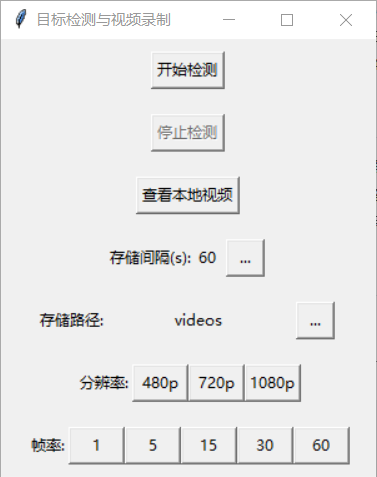
主界面:
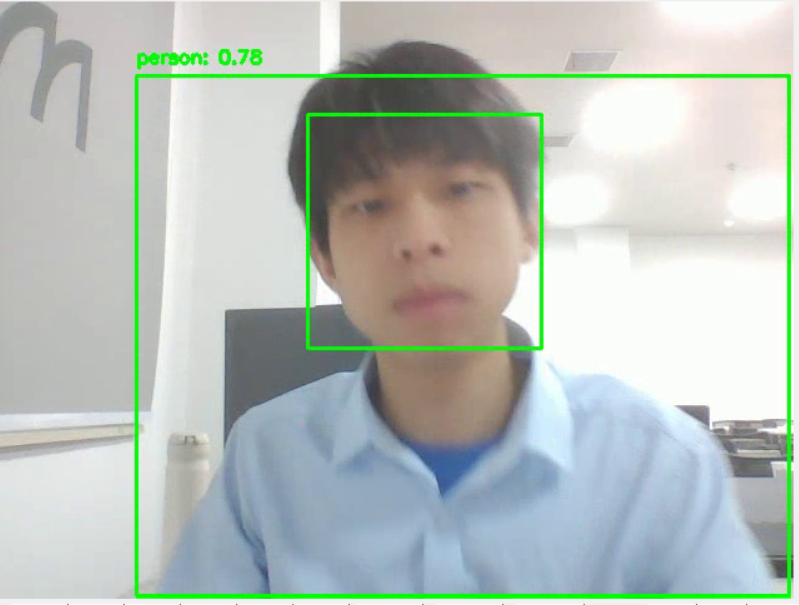
目标检测效果:
main.py
import cv2
import time
import os
import subprocess
import numpy as np

from Yolo4Detect import Yolo4Detect
from VideoBrowser import VideoBrowser
from VideoRecorder import VideoRecorder
from VideoPlayer import VideoPlayer

import tkinter as tk
from tkinter import messagebox, filedialog ,simpledialog
from threading import Thread


# 创建 Tkinter 窗口
class Application(tk.Tk):
    def __init__(self):
        super().__init__()

        self.title("目标检测与视频录制")
        self.geometry("300x350")

        # 创建 VideoRecorder 实例
        self.recorder = VideoRecorder(self)

        # 存储路径变量
        self.storage_path = self.recorder.video_dir  # 直接从 recorder 获取 video_dir
        self.timepoint = self.recorder.timepoint

        # 开始录制按钮
        self.start_button = tk.Button(self, text="开始检测", command=self.start_recording)
        self.start_button.pack(pady=10)

        # 停止录制按钮
        self.stop_button = tk.Button(self, text="停止检测", command=self.stop_recording)
        self.stop_button.pack(pady=10)
        self.stop_button.config(state=tk.DISABLED)

        # 查看本地视频按钮
        self.view_button = tk.Button(self, text="查看本地视频", command=self.view_local_videos)
        self.view_button.pack(pady=10)

        # 绑定关闭窗口事件
        self.protocol("WM_DELETE_WINDOW", self.on_closing)

        # 时间间隔设置
        self.timepointgrid = tk.Frame(self, width=300 ,height= 100)
        self.timepointgrid.pack(pady=10)
        tk.Label(self.timepointgrid, text="存储间隔(s):").grid(row=0, column=0)
        self.showtimepoint = tk.Label(self.timepointgrid, width=2,text=self.timepoint, justify="right")
        self.showtimepoint.grid(row=0, column=1)
        self.changetimepoint = tk.Button(self.timepointgrid, text="...", width=3, command = self.change_timepoint)
        self.changetimepoint.grid(row=0, column=2, padx=5)

        # 存储路径布局
        self.savapathgrid = tk.Frame(self, width=300)
        self.savapathgrid.pack(pady=10)
        tk.Label(self.savapathgrid, text="存储路径:").grid(row=0, column=0)
        self.path_label = tk.Label(self.savapathgrid, width=20,text=self.storage_path, justify="right")  # 直接显示路径
        self.path_label.grid(row=0, column=1)
        # 选择路径的按钮
        self.browse_button = tk.Button(self.savapathgrid, text="...", width=3, command=self.changesavepath)
        self.browse_button.grid(row=0, column=2, padx=5)

        # 分辨率布局
        self.fenbianlvgrid = tk.Frame(self, width=300, height=100)
        self.fenbianlvgrid.pack(pady=10)
        tk.Label(self.fenbianlvgrid, text="分辨率:").grid(row=0, column=0)
        self.p480 = tk.Button(self.fenbianlvgrid, text="480p", width=5, command=self.p480)
        self.p480.grid(row=0, column=1)
        self.p720 = tk.Button(self.fenbianlvgrid, text="720p", width=5, command=self.p720)
        self.p720.grid(row=0, column=2)
        self.p1080 = tk.Button(self.fenbianlvgrid, text="1080p", width=5, command=self.p1080)
        self.p1080.grid(row=0, column=3)

        # 帧率控制布局
        self.zhenlvgrid = tk.Frame(self, width=300 ,height= 100)
        self.zhenlvgrid.pack(pady=10)
        # 帧率切换
        tk.Label(self.zhenlvgrid, text="帧率:").grid(row=0, column=0)
        self.zhen1 = tk.Button(self.zhenlvgrid, text="1", width=5, command=self.fps1)
        self.zhen1.grid(row=0, column=1)
        self.zhen5 = tk.Button(self.zhenlvgrid, text="5", width=5, command=self.fps5)
        self.zhen5.grid(row=0, column=2)
        self.zhen15 = tk.Button(self.zhenlvgrid, text="15", width=5, command=self.fps15)
        self.zhen15.grid(row=0, column=3)
        self.zhen30 = tk.Button(self.zhenlvgrid, text="30", width=5, command=self.fps30)
        self.zhen30.grid(row=0, column=4)
        self.zhen60 = tk.Button(self.zhenlvgrid, text="60", width=5, command=self.fps60)
        self.zhen60.grid(row=0, column=5)


    # Application 类中的分辨率按钮回调函数
    def p480(self):
        self.recorder.setfenbianlv_async(640, 480)  # 异步切换分辨率
        self.start_button.config(state=tk.DISABLED)
        self.stop_button.config(state=tk.NORMAL)

    def p720(self):
        self.recorder.setfenbianlv_async(1280, 720)  # 异步切换分辨率
        self.start_button.config(state=tk.DISABLED)
        self.stop_button.config(state=tk.NORMAL)

    def p1080(self):
        self.recorder.setfenbianlv_async(1920, 1080)  # 异步切换分辨率
        self.start_button.config(state=tk.DISABLED)
        self.stop_button.config(state=tk.NORMAL)

    def fps1(self):
        self.recorder.setfps(1)
    def fps5(self):
        self.recorder.setfps(5)
    def fps15(self):
        self.recorder.setfps(15)
    def fps30(self):
        self.recorder.setfps(30)
    def fps60(self):
        self.recorder.setfps(60)

    def changesavepath(self):
        """更新存储路径"""
        # 打开文件对话框选择新路径
        new_path = filedialog.askdirectory(initialdir=self.storage_path, title="选择存储路径")

        if new_path:
            # 更新 VideoRecorder 的 video_dir 属性
            self.recorder.set_video_dir(new_path)

            # 更新界面显示的路径
            self.storage_path = new_path
            self.path_label.config(text=self.storage_path)

            # 读取并修改 config.info 文件中的路径
            with open("config.info", "r") as config_file:
                lines = config_file.readlines()

            # 找到并修改 path 行
            with open("config.info", "w") as config_file:
                for line in lines:
                    if line.startswith('path='):
                        config_file.write(f'path={new_path}\n')
                    else:
                        config_file.write(line)

    def change_timepoint(self):
        # 弹出输入框让用户输入新的时间间隔
        new_timepoint = simpledialog.askinteger("输入新的时间间隔", "请输入新的时间间隔(秒):", parent=self)
        if new_timepoint:
            # 更新 VideoRecorder 的 video_dir 属性
            self.recorder.settimepoint(new_timepoint)

            # 更新界面显示的路径
            self.timepoint = new_timepoint
            self.showtimepoint.config(text=self.timepoint)

            # 读取并修改 config.info 文件中的路径
            with open("config.info", "r") as config_file:
                lines = config_file.readlines()

            # 找到并修改 path 行
            with open("config.info", "w") as config_file:
                for line in lines:
                    if line.startswith('timepoint='):
                        config_file.write(f'timepoint={new_timepoint}\n')
                    else:
                        config_file.write(line)


    def start_recording(self):
        self.start_button.config(state=tk.DISABLED)
        self.stop_button.config(state=tk.NORMAL)
        self.recorder.start_recording()

    def stop_recording(self):
        self.start_button.config(state=tk.NORMAL)
        self.stop_button.config(state=tk.DISABLED)
        self.recorder.stop_recording()

    def view_local_videos(self):
        """打开本地视频浏览器"""
        VideoBrowser(self.recorder.video_dir)

    def on_closing(self):
        """当点击窗口右上角关闭按钮时释放摄像头资源"""
        self.recorder.cap.release()  # 释放摄像头
        self.destroy()  # 关闭窗口

# 启动 Tkinter 应用
if __name__ == "__main__":
    app = Application()
    app.mainloop()
Yolo4Detect.py
#Yolo4检测类
import cv2
import os
import numpy as np


class Yolo4Detect:
    def __init__(self):
        self.yolo_cfg = "yolo/yolov4.cfg"
        self.yolo_weights = "yolo/yolov4.weights"
        self.yolo_classes = "yolo/coco.names"

        # 读取类别名称
        with open(self.yolo_classes, "r") as f:
            self.class_names = f.read().strip().split("\n")

        # 只检测车辆相关类别(COCO 数据集 ID)
        self.vehicle_classes = ["car", "bus", "truck", "motorbike","person"]

        # 加载 YOLO
        self.net = cv2.dnn.readNet(self.yolo_weights, self.yolo_cfg)
        self.net.setPreferableBackend(cv2.dnn.DNN_BACKEND_OPENCV)  # 使用 OpenCV DNN 加速
        self.net.setPreferableTarget(cv2.dnn.DNN_TARGET_CPU)  # 运行在 CPU(可修改为 DNN_TARGET_CUDA 以使用 GPU)

        # 获取 YOLO 的输出层
        layer_names = self.net.getLayerNames()
        self.output_layers = [layer_names[i - 1] for i in self.net.getUnconnectedOutLayers()]

    def detectbyyolo4(self, image, conf_threshold=0.5, nms_threshold=0.4, show_result=False, save_result=False, save_path="detected_image.jpg"):
        """
        进行车辆检测
        :param image: 可以是图片路径(str) 或 OpenCV 读取的 numpy 数组
        """
        # 如果传入的是路径,则读取图片
        if isinstance(image, str):
            image = cv2.imread(image)
            if image is None:
                print(f"无法读取图片: {image_path}")
                return None

        height, width = image.shape[:2]

        # YOLO 需要 416x416 或 608x608 输入
        blob = cv2.dnn.blobFromImage(image, 1 / 255.0, (416, 416), swapRB=True, crop=False)
        self.net.setInput(blob)

        # 前向传播
        outputs = self.net.forward(self.output_layers)

        # 解析检测结果
        boxes, confidences, class_ids = [], [], []

        for output in outputs:
            for detection in output:
                scores = detection[5:]
                class_id = np.argmax(scores)
                confidence = scores[class_id]

                # 只检测车辆类别,并设定置信度阈值
                if self.class_names[class_id] in self.vehicle_classes and confidence > conf_threshold:
                    center_x, center_y, w, h = (detection[:4] * [width, height, width, height]).astype("int")

                    # 计算矩形框的左上角坐标
                    x = int(center_x - w / 2)
                    y = int(center_y - h / 2)

                    boxes.append([x, y, w, h])
                    confidences.append(float(confidence))
                    class_ids.append(class_id)

        # NMS 去重
        indices = cv2.dnn.NMSBoxes(boxes, confidences, conf_threshold, nms_threshold)
        if len(indices) > 0:
            for i in indices.flatten():
                x, y, w, h = boxes[i]
                label = f"{self.class_names[class_ids[i]]}: {confidences[i]:.2f}"
                cv2.rectangle(image, (x, y), (x + w, y + h), (0, 255, 0), 2)
                cv2.putText(image, label, (x, y - 10), cv2.FONT_HERSHEY_SIMPLEX, 0.5, (0, 255, 0), 2)
        else:
            yuer = 1
            #print("没有检测到任何目标!")

        # 显示或保存检测结果
        if show_result:
            cv2.imshow("Vehicle Detection", image)
            cv2.waitKey(0)
            cv2.destroyAllWindows()

        if save_result:
            cv2.imwrite(save_path, image)
            print(f"检测结果已保存到 {save_path}")

        return image


if __name__ == "__main__":
    yolodetector = Yolo4Detect()
    yolodetector.detectbyyolo4(r"test/CarandPerson.png",show_result=True)
VideoRecorder.py
#视频录制类
import os
import cv2
import time
import threading

from Yolo4Detect import Yolo4Detect

import tkinter as tk
from tkinter import messagebox, filedialog

from threading import Thread


class VideoRecorder(tk.Toplevel):
    def __init__(self, root):
        self.deviceid = 0
        self.root = root
        self.width = 640
        self.height = 480
        self.cap = cv2.VideoCapture(self.deviceid)

        # 从 config.info 文件中读取路径配置
        self.load_config()

        # 设置视频捕获的宽高
        self.cap.set(cv2.CAP_PROP_FRAME_WIDTH, self.width)
        self.cap.set(cv2.CAP_PROP_FRAME_HEIGHT, self.height)

        self.fps = 30
        self.fourcc = cv2.VideoWriter_fourcc(*'mp4v')
        self.out = None
        self.recording = False
        self.start_time = None

        # 如果没有视频存储目录,则创建
        if not os.path.exists(self.video_dir):
            os.makedirs(self.video_dir)

    def settimepoint(self,times):
        self.timepoint= times

    def load_config(self):
        """读取 config.info 文件并设置 video_dir 和 frontalfacepath"""
        try:
            with open('config.info', 'r') as file:
                for line in file:
                    # 查找配置项 path
                    if line.startswith("path="):
                        self.video_dir = line.strip().split('=')[1]
                    # 查找配置项 frontalfacepath
                    elif line.startswith("frontalface="):
                        self.frontalfacepath = line.strip().split('=')[1]
                    elif line.startswith("timepoint="):
                        self.timepoint = line.strip().split('=')[1]
        except Exception as e:
            print(f"读取 config.info 时发生错误: {e}")
            # 如果读取配置文件出错,使用默认目录和默认人脸分类器路径
            self.video_dir = 'videos'
            self.frontalface = "cvxml/haarcascade_frontalface_default.xml"
            self.timepoint = 60


    def set_video_dir(self,new_path):
        self.video_dir = new_path
    def setfps(self, fps):
        self.fps = fps

    def getmyinfo(self):
        print("video_dir:", self.video_dir)

    def cv2init(self):
        """重新初始化摄像头"""
        self.cap.release()
        self.cap = cv2.VideoCapture(self.deviceid)
        self.cap.set(cv2.CAP_PROP_FRAME_WIDTH, self.width)
        self.cap.set(cv2.CAP_PROP_FRAME_HEIGHT, self.height)

    def start_recording(self):
        """开始录制视频"""
        if not self.cap.isOpened():
            self.cv2init()
        self.thread = Thread(target=self.record_video)  # 启动录制线程
        self.thread.start()

    def stop_recording(self):
        """停止录制视频"""
        self.recording = False
        if self.out:
            self.out.release()
            self.thread.join()  # 等待线程关闭结束
        messagebox.showinfo("停止录制", "视频已保存。")

    def record_video(self):
        """视频录制线程函数"""
        self.recording = True
        self.start_time = time.time()
        video_path = os.path.join(self.video_dir, f"video_" + str(time.time()) + ".mp4")  # 生成视频文件名
        self.out = cv2.VideoWriter(video_path, self.fourcc, self.fps, (self.width, self.height))

        print(self.frontalfacepath)
        face_cascade = cv2.CascadeClassifier("cvxml/haarcascade_frontalface_default.xml")  # 加载 opencv-Haar 分类器
        yolodetector = Yolo4Detect()  # 初始化 yolov4 判断器

        while self.recording:
            ret, frame = self.cap.read()
            if not ret:
                print("无法接收视频帧,退出")
                break

            gray = cv2.cvtColor(frame, cv2.COLOR_BGR2GRAY)  # 转为灰度图像进行人脸检测
            faces = face_cascade.detectMultiScale(gray, scaleFactor=1.1, minNeighbors=5, minSize=(30, 30))

            for (x, y, w, h) in faces:
                cv2.rectangle(frame, (x, y), (x + w, y + h), (0, 255, 0), 2)

            frame = yolodetector.detectbyyolo4(frame)  # yolo4再检测一轮

            # 每 X 秒切换一个新文件
            if time.time() - self.start_time >= int(self.timepoint):
                if self.out:
                    self.out.release()
                video_path = os.path.join(self.video_dir, f"video_" + str(time.time()) + ".mp4")
                self.out = cv2.VideoWriter(video_path, self.fourcc, self.fps, (self.width, self.height))
                self.start_time = time.time()

            self.out.write(frame)  # 记录视频
            cv2.imshow('Camera', frame)  # 显示视频帧
            cv2.waitKey(int(1000 / self.fps))

        cv2.destroyAllWindows()

    def setfenbianlv(self, width, height):
        """设置分辨率"""
        if self.recording:
            # 停止当前录制
            self.recording = False
            if self.out:
                self.out.release()
                #self.cap.release()
                self.thread.join()  # 等待线程关闭结束

            self.width = width
            self.height = height
            self.cv2init()
            # 检查是否支持该分辨率
            actual_width = int(self.cap.get(cv2.CAP_PROP_FRAME_WIDTH))
            actual_height = int(self.cap.get(cv2.CAP_PROP_FRAME_HEIGHT))

            if actual_width == width and actual_height == height:
                # 使用 after() 将消息框更新操作放到主线程
                self.root.after(100, self.show_resolution_message, "分辨率兼容", "切换成功!")
                #self.cv2init()  # 重新初始化摄像头
                self.thread = Thread(target=self.record_video)
                self.thread.start()
            else:
                self.root.after(100, self.show_resolution_message, "分辨率不兼容", "已切换回默认分辨率")
                self.width = 640
                self.height = 480
                self.cv2init()  # 切换回默认分辨率
                self.thread = Thread(target=self.record_video)
                self.thread.start()
        else:
            self.recording = False
            if self.out:
                self.out.release()
                self.cap.release()
                self.thread.join()
            self.width = width
            self.height = height
            self.cv2init()  # 重新初始化摄像头
            actual_width = int(self.cap.get(cv2.CAP_PROP_FRAME_WIDTH))
            actual_height = int(self.cap.get(cv2.CAP_PROP_FRAME_HEIGHT))
            # 检查摄像头是否支持该分辨率
            if actual_width == width and actual_height == height:
                self.root.after(100, self.show_resolution_message, "分辨率兼容", "切换成功!")
                self.thread = Thread(target=self.record_video)
                self.thread.start()
            else:
                self.root.after(100, self.show_resolution_message, "分辨率不兼容", "切换回默认分辨率。")
                self.width = 640
                self.height = 480
                self.cv2init()  # 切换回默认分辨率


    def setfenbianlv_async(self, width, height):
        """异步设置分辨率"""
        threading.Thread(target=self.setfenbianlv, args=(width, height)).start()

    def show_resolution_message(self, title, message):
        """显示分辨率切换的提示信息"""
        messagebox.showinfo(title, message)


if __name__ == "__main__":
    root = tk.Tk()
    recorder = VideoRecorder(root)  # 创建 VideoRecorder 实例
    recorder.getmyinfo()
    root.mainloop()
VideoBrowser.py
#浏览本地视频类
import os
import subprocess
import tkinter as tk
from tkinter import messagebox, filedialog
from VideoPlayer import VideoPlayer


class VideoBrowser(tk.Toplevel):
    def __init__(self, video_dir):
        super().__init__()

        self.title("本地视频浏览器")
        self.geometry("400x300")
        self.video_dir = video_dir

        # 列表框
        self.listbox = tk.Listbox(self, width=50, height=15)
        self.listbox.pack(pady=10)

        # 绑定双击事件
        self.listbox.bind("<Double-Button-1>", self.open_selected_file)

        # 加载视频列表
        self.load_videos()

    def load_videos(self):
        """加载 videos 目录下的所有 .mp4 文件"""
        if not os.path.isdir(self.video_dir):
            messagebox.showerror("错误", "视频目录不存在!")
            return

        mp4_files = [f for f in os.listdir(self.video_dir) if f.endswith('.mp4')]
        self.listbox.delete(0, tk.END)  # 清空列表
        for file in mp4_files:
            self.listbox.insert(tk.END, file)

    def open_selected_file(self, event):
        """双击打开选中的 MP4 文件"""
        selected_index = self.listbox.curselection()
        if selected_index:
            selected_file = self.listbox.get(selected_index)  # 获取选中的文件名
            file_path = os.path.join(self.video_dir, selected_file)  # 构造完整路径
            vp = VideoPlayer(file_path)
        else:
            messagebox.showerror("错误", "文件不存在!")

# 确保 main 函数启动
if __name__ == "__main__":
    # 指定视频目录路径
    video_dir = "videos"  # 修改为实际视频文件夹路径
    root = tk.Tk()  # 创建主窗口
    video_browser = VideoBrowser(video_dir)  # 创建 VideoBrowser 实例
    root.mainloop()  # 启动主事件循环
VideoPlayer.py
#视频播放类
import cv2
import tkinter as tk
from PIL import Image, ImageTk

class VideoPlayer(tk.Toplevel):
    def __init__(self, video_source):
        super().__init__()

        self.title("查看视频")
        self.state("zoomed")
        # 视频源
        self.video_source = video_source
        self.vid = cv2.VideoCapture(video_source)

        if not self.vid.isOpened():
            print("无法打开视频文件:", video_source)
            self.destroy()
            return

        # 获取视频的基本信息
        self.frame_count = int(self.vid.get(cv2.CAP_PROP_FRAME_COUNT))
        self.fps = int(self.vid.get(cv2.CAP_PROP_FPS))
        self.original_width = int(self.vid.get(cv2.CAP_PROP_FRAME_WIDTH))
        self.original_height = int(self.vid.get(cv2.CAP_PROP_FRAME_HEIGHT))

        # 默认分辨率(初始化时设为原始分辨率)
        self.width = self.original_width
        self.height = self.original_height

        # 获取屏幕的最大尺寸
        self.max_width = self.winfo_screenwidth()
        self.max_height = self.winfo_screenheight() - 150

        # 限制视频画布的大小
        self.width = min(self.width, self.max_width)
        self.height = min(self.height, self.max_height)

        # 创建 Tkinter 画布
        self.canvas = tk.Canvas(self, width=self.width, height=self.height)
        self.canvas.pack()

        # 创建控制按钮
        self.create_controls()

        # 进度条
        self.progress = tk.Scale(self, from_=0, to=self.frame_count, orient=tk.HORIZONTAL, length=500, command=self.set_position)
        self.progress.pack(fill=tk.X)

        # 绑定窗口关闭事件
        self.protocol("WM_DELETE_WINDOW", self.on_close)

        # 开始播放
        self.update()

    def create_controls(self):
        """ 创建播放控制按钮 """
        control_frame = tk.Frame(self)
        control_frame.pack()

        # 帧率切换
        tk.Label(control_frame, text="选择帧率:").pack(side=tk.LEFT)
        for fps in [1,5, 10, 15, 30, 60]:
            tk.Button(control_frame, text=f"{fps}帧", width=5, command=lambda f=fps: self.set_fps(f)).pack(side=tk.LEFT)

        # 快进 & 回退
        tk.Button(control_frame, text="回退5秒", command=self.jump_backward).pack(side=tk.LEFT, padx=5)
        tk.Button(control_frame, text="快进5秒", command=self.jump_forward).pack(side=tk.LEFT, padx=5)

        # 播放/暂停
        self.pause_button = tk.Button(control_frame, text="⏸ 暂停", command=self.toggle_pause)
        self.pause_button.pack(side=tk.LEFT, padx=5)

        # 分辨率切换
        tk.Label(control_frame, text="分辨率:").pack(side=tk.LEFT)
        tk.Button(control_frame, text="480p", command=lambda: self.set_resolution(854, 480)).pack(side=tk.LEFT)
        tk.Button(control_frame, text="720p", command=lambda: self.set_resolution(1280, 720)).pack(side=tk.LEFT)
        tk.Button(control_frame, text="1080p", command=lambda: self.set_resolution(1920, 1080)).pack(side=tk.LEFT)
        tk.Button(control_frame, text="原始", command=lambda: self.set_resolution(self.original_width, self.original_height)).pack(side=tk.LEFT)

    def update(self):
        """ 更新视频帧 """
        if not hasattr(self, "is_paused") or not self.is_paused:
            ret, frame = self.vid.read()
            if ret:
                self.current_frame = int(self.vid.get(cv2.CAP_PROP_POS_FRAMES))
                frame = cv2.cvtColor(frame, cv2.COLOR_BGR2RGB)

                # 根据当前分辨率调整缩放比例
                frame = cv2.resize(frame, (self.width, self.height))
                img = Image.fromarray(frame)
                imgtk = ImageTk.PhotoImage(image=img)
                self.canvas.create_image(0, 0, anchor=tk.NW, image=imgtk)
                self.canvas.imgtk = imgtk

                # 更新进度条
                self.progress.set(self.current_frame)

        self.after(int(1000 / self.fps), self.update)

    def set_fps(self, fps):
        """ 设置帧率 """
        self.fps = fps

    def set_position(self, val):
        """ 拖动进度条时调整视频位置 """
        frame_number = int(val)
        self.vid.set(cv2.CAP_PROP_POS_FRAMES, frame_number)
        self.current_frame = frame_number

        # 让视频画面立即更新
        ret, frame = self.vid.read()
        if ret:
            frame = cv2.cvtColor(frame, cv2.COLOR_BGR2RGB)
            frame = cv2.resize(frame, (self.width, self.height))
            img = Image.fromarray(frame)
            imgtk = ImageTk.PhotoImage(image=img)
            self.canvas.create_image(0, 0, anchor=tk.NW, image=imgtk)
            self.canvas.imgtk = imgtk

    def jump_forward(self):
        """ 快进 5 秒 """
        target_frame = min(self.current_frame + self.fps * 5, self.frame_count - 1)
        self.vid.set(cv2.CAP_PROP_POS_FRAMES, target_frame)
        self.current_frame = target_frame

        # 同步进度条 & 立即更新画面
        self.progress.set(target_frame)
        self.update()

    def jump_backward(self):
        """ 回退 5 秒 """
        target_frame = max(self.current_frame - self.fps * 5, 0)
        self.vid.set(cv2.CAP_PROP_POS_FRAMES, target_frame)
        self.current_frame = target_frame

        # 同步进度条 & 立即更新画面
        self.progress.set(target_frame)
        self.update()

    def toggle_pause(self):
        """ 播放/暂停切换 """
        self.is_paused = not getattr(self, "is_paused", False)
        if self.is_paused:
            self.pause_button.config(text="▶️ 播放")
        else:
            self.pause_button.config(text="⏸ 暂停")

    def set_resolution(self, width, height):
        """ 设置分辨率,确保不超过屏幕最大尺寸 """
        self.width, self.height = min(width, self.max_width), min(height, self.max_height)
        self.canvas.config(width=self.width, height=self.height)

    def on_close(self):
        """ 释放资源并关闭窗口 """
        if self.vid.isOpened():
            self.vid.release()
        self.destroy()

if __name__ == "__main__":
    root = tk.Tk()
    root.geometry('200x100')
    video_path = 'test/videodemo.mp4'
    player = VideoPlayer(video_path)
    root.mainloop()
发表评论: